Should this Duct Layout be Banned?

  When is it ok to put your ducts into an attic, tight up against the Roof Deck?  With more conventional building techniques, I would have to argue: NEVER!  I do not care how the homeonwer pleads to keep their storage space, you cannot count on delivering cool air to the conditioned space with said branch duct.  Even if you did figure out a way to secure the duct to the peak without crushing the inside diameter, the CFM is not the problem.  The real issue becomes the dry bulb temperature of the air by the time it hits the terminal, significantly warmer than design.
Typical Roof Temp - http://www.fsec.ucf.edu
  As seen in Figure 1, during normal Summer conditions with a well sealed and insulated attic, the roof deck could be at least 25F warmer than the surrounding attic air!  I will not bore you with the radiant exposure and reasoning, the fact is that surface is significantly warmer than the space.  How do you think the attic temperature continues to rise during those hot Summer days?
  So, with this engrained in my head since the beginning of my HVAC time, I have preached this cardinal sin for duct layout for years: until today.   I have finally seen a situation that I could not argue with, granted a very expensive solution.  When the roof deck is spray foamed, the surface temperature of that insulation is much closer to the attic, which is now within the building envelope!  I would still argue that this is not the way to secure the duct, as avoiding the use of flex duct in this type of layout could go a long way.
  What do you think about ducts in an attic?  I find they are a huge efficiency drain, sucking money from a homeowner's pocket year round.  Equipment must be larger, there will always be leakage, most attics are not ideally vented, and never mind the IAQ issues!  I was once with a contractor that found multiple dead animals in an attic that caused a stench like no other, sucked in through leaky returns and evenly distributed through out the home.  Is the answer to remove attic ducts as an option, via code?  Maybe eliminate attics?

Top 5 Changes to ACCA Manual S

     As I had brought up years ago, right here on Excess Air, ACCA's Manual S was in dyer need of an update.  Written in 1995, Manual S Residential Equipment Selection was passed by with huge technical and efficiency strides within the HVAC industry.  Think about it: ECM Motors were in their infancy, condensing furnaces were still prone to failures, and variable refrigerant flow was far from mainstream in the U.S.  All addressed in the updated Manual S! I have to say, their committee did a thorough job addressing updates to a process that is essential to system design and a code requirement in most of our country!  I highly recommend HVAC Sales Staff, System Designers, and Building Analysts purchase a copy of the new text, but in the meantime here is a teaser:

1.  Multi-Stage Central A/C: can be sized between .90 and 1.20 of the total building load.  This additional 5% of capacity vs. 1995 becomes increasingly important as homes get tighter and Sensible Heat Ratios rise.  Higher airflow to handle the increase in sensible loads lends to higher capacities.

2.  Variable Capacity Central A/C: can be sized between .90 and 1.30 of the total load.  See #1 for sensible capacity reasons, but variable capacity equipment is great for handling high latent capacities when operating on part load days as well.

3.  Cold Climate Heat-Pumps: can be sized to the total cooling building load + 15,000 btu/hr maximum.  This goes for single-stage, two-stage, and variable capacity equipment.  For mini-split heat-pumps, this 15K is above the total block load.

4.  Heat Pump Supplemental Electric Heaters: can be no larger than 5KW if the heat load is < 15,000 btu/hr.

5.  Fossil Fuel Burning Furnaces and Boilers: can be sized between 1.0 and 1.40 of the total heat load.  Ok, this isn't a change, just thought it was important to know!  If installing a furnace that needs a larger blower for cooling, maximum is now 2.0.

     Loaded with up to date examples, the new Manual S is far from a dust collector.  A great reference manual, but lets just hope it is not for another two decades like it's predecessor...but don't take my word for it!

UPDATED: Big Changes for Duct Testing in MA

      If you have not been asked to complete a duct test by your local Massachusetts Inspector, it is just a matter of time before you are surprised by this stringent/updated code requirement.  Despite some push-back from Contractors  and Inspectors, all of MA is required to test new or altered duct systems.  All of MA adopted the 2012 International Energy Conservation Code (IECC), enforced as of August 16, 2014.  Unlike the previous code, this makes what was considered the "Stretch Code" now the base residential code.  Also, it pays to know their permit structure, to avoid losing what could amount to be a significant part of your profit on these jobs.
Procedure with TEC Duct Blaster
     If you are working in any of the cities and towns across MA, you are required to complete a "Total Leakage Duct Test".  Unfortunately for most, the new required qualification of being a HERS Rater or BPI Certified Professional can be a stumbling block.  True, we have many certified individuals throughout the state - myself being one.  This may be an added cost to your job, one you may not have been prepared to pay for.  For New Construction, this test is typically completed by the HERS Rater as part of the building permit process.  Just imagine you are asked for the duct leakage report on a retrofit, a new duct system in an existing home.  Surprise, lost profit!
      The code is now three times more stringent than it was last week.  Gone are the days of passing a total leakage duct test by chance.  We are now required to make a whopping 4CFM / 100 SqFt., or 4% leakage rate.  One must take careful attention to seal all seams with UL Listed mastic in order to reach this goal.  The fortunate alternative is that if all ducts are in conditioned spaces, they do not have to be tested!
     Anyhow, take a look at the attached document I created, I think it will help those that are just becoming involved with Duct Testing in MA.  Also, please share your experiences with the local city and town requirements by commenting below - nobody likes to be surprised.

No Bubbles, No Troubles!

  Or is there?  This saying is an old adage in our industry to let the technician know that the refirgerant charge is "all set".  You see, there must be a steady stream of liquid to the metering device for it to function properly.  For sake of conversation, let's use the TXV.  In order for most TXV's to throttle and correctly maintain the desired Superheat, there must be a minimum of 2F of subcooled liquid at the valve (not where it is measured, near the condenser).  If the liquid were to flash off ahead of the valve, destruction to the TXV may occur.  So, some old timer along the way figured he would look into the sight glass (what we install in residential air-conditioners this day and age are moisture indicators), and determine if there was a steady stream of liquid, or in other words: "No Bubble, No Troubles!".  For years, this method combined with "beer can cold", or "sweating back to the compressor" were used to determine the refrigerant charge was 'close enough'.  Those that know me know that I speak from experience here, I have tried them all!
  What we were missing was the fact we were overcharging systems, significantly.  Sometimes to the point of slugging compressors, particularly with fixed orifice systems.  Having a steady stream of liquid does not mean the refrigerant charge is correct!  I know, I am preaching to the choir here.  You see, if you are reading my blog than you care enough to learn how to do things right.  I am sure you have picked up an installation manual recently and actually flipped through it, instead of kneeling on it and tossing it into the trash!  If you have, you will notice that no where in these books does it read, "No Bubbles, No troubles!"  If it were that simple, than they would have put it into the start-up procedure.  Do me a favor: stop wasting energy and killing compressors, okay?  Take the extra ten minutes to measure the Superheat and Subcooling on the system, and verify they are within manufacturer specs.  Believe me, you will have less warrantied labor work where you make zero profit replacing compressors!

How do You Test a TXV?

  Thermostatic Expansion Valves (TEV or TXV), one of the most popular metering devices for residential, high-efficient air conditioning and heat pumps, have performed almost impeccably for decades.  Unfortunately, some manufacturers in the past few years have identified batches of valves that have had high superheat issues.  Have we just been blind for so long, not realizing these problems existed?  Or have these valves really been so reliable for such a long time?
  If you think you may have a TXV issue, there is a very simple test that can be completed using just crushed ice and a set of accurate gauges:
  1. With the system operating, attach your accurate/calibrated manifold.
  2. Detach your TXV's sensing bulb and submerse completely into crushed ice.  (Caution: not just ice water, must be 32F).  I recommend using an insulated cup!
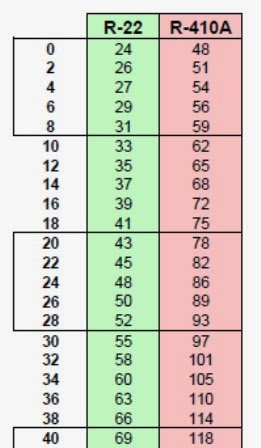
  3. Your Saturation Temperature of the Evaporator should be (32F - TXV Superheat).  Example:  Your R-410A TXV has a desired Superheat of 8F.  32F - 8F = 24F Saturation Temp
  4. Using your Pressure/Temperature Saturation Chart, convert Temperature to Pressure for the refrigerant used (Fig. 1).  The Suction pressure should be relatively close to this value.  


Saturation Chart

Sporlan Recommendations, Bulletin 10-9
If outside of the acceptable range (Fig.2), adjustment or replacement is recommended. 
When adjusting TXV Superheat, remember that you make a single turn at a time.  Changes to the TXV Superheat can take as much as 30 minutes of system operation to be measured.


To Reduce Superheat: Turn valve stem COUNTER-CLOCKWISE.
To Increase Superheat: Turn valve stem CLOCKWISE.

  There are many possibilities that could cause high superheat, besides a faulty TXV.  By using this method, you could save yourself some serious service time needlessly replacing a TXV during the busiest time of year!

Please, Make the Transition!

  For as long as I can remember, the agreed epidemic with ductwork was always undersized return ducts.  Although we are far from perfect with duct sizing in New England, I have frequently seen great strides in fixing this issue - particularly with replacement systems.  Lets face it, you should just be properly designing the duct system on new installations.  Undersized ducts cause great restrictions in airlfow, raising static pressure and lowering the cubic feet per minute (CFM).  Or, with ECM motors, raising the amperage draw above full load.  More recently, I continue to find efforts with regards to sizing, but other rules of duct design being ignored.  I am going to concentrate on one particular rule that can have the same affect as undersized ducts:
  • On supply and return, when the trunk is wider than the plenum, a transition fitting must be used!
Fig.1  No Transition: Filter Box
   Lack of transitions create turbulence and restrictions in your duct system.  Even if the Return Duct is large enough for your desired CFM, abrupt changes in sizes without a tapered transition raises static pressure drastically above design.  Take Figure 1 for example.  Imagine the force needed to pull the same volume of air through the nice IAQ Filter installed.  At least the entire filter area is being used! I frequently find larger filter boxes than the air handler opening, a waste of filter area - but at least less of a restriction.

Fig. 2 Return Drop
  Figure 2 is an all too common mistake on replacement system, when installing a high performance filter in basement systems.  The new filter box pushes the return drop out of the range of connecting to the trunk, without an offset transition.  Most tin-knockers will do what they can to get the furnace operating.  Following this up by cutting in a grille in the return drop to either fix the undersized ducts, or lack of a transition, is not going to work when it comes to air-conditioning!  The air must come from the conditioned space in order to remove the latent heat, not from a moisture laden basement...

  Can anyone tell me what is going on in Figure 3???  I hope this wasn't you!
Fig. 3 Supply Transition(s)?


Top 5 A/C Code Requirements not Enforced

     This list does not represent the entire code, or even all municipalities.  Everyone knows those towns that will hit you on every piece of the local code requirements, word for word from the text.  But, don't be surprised when code officials, both building and mechanical inspectors, start failing permit inspections for these previously rarely enforced portions of the code!  Are you going to wait until enforcement, or lead the industry in doing what the minimum is required by law?

1.  Duct Testing
  Although this has been enforced to some degree throughout MA and RI, the code is about to become a whole lot more stringent.  Gone will be the days of installing your duct systems within the building envelope to avoid pressure testing your ducts, better known as the leakage to outdoors test.  The only enforced standard, based on the 2012 International Energy Conservation Code (IECC), will be a total leakage test.  New duct systems must be pressure tested to 25 pa (.10"w.c.) and leak no more than 4 CFM per 100 square feet the unit services (Total Leakage/Sq.Ft = <4%).  To go from zero enforcement to the most stringent code internationally will be quite the wake up call for all of us tin-knockers!

System Design starts with a Load Calc!
2.  Equipment Selection
  ACCA's Manual S, Residential Equipment Selection, has recently been revised from the original published in 1995.  These updates include allowances for variable speed equipment.  I recommend you understand the sizing limits imposed in this manual as the 2012 International Residential Code requires proper sizing in the design process.  Some manufacturers make this process easy for you electronically, but most do not and some basic math will be required!  Equipment selection not only takes into account maximum and minimum limits to sizing, but also requires you re-rate your equipment based on the airflow and design conditions of your home.

3.  Condensate Overflow Switches
  This one sounds so simple, how could it not be enforced?  Well, this code requirement applies to all A/C, Heat Pumps, and condensing furnaces.  For conventional equipment, this overflow switch is typically installed on the overflow/secondary pan and stops possible damage to ceilings and floors.  What most do not realize is that this applies to Ductless, Mini-split systems as well. The switch must be much smaller than for conventional equipment and this cost can add up per indoor unit!

4.  Locking Refrigerant Caps
  Another "no-brainer" here.  This code requirement was without a doubt written blood, like most laws.  Unfortunately, every year there is a national story of some unexpected child that loses their life attempting to "huff" refrigerant.  I do not need to get into the particulars here, just start using them if you have not already.  This is one that I would promote manufacturers just institute on their own, it is an International Residential Code requirement!

5.  Line set Insulation
  In order to meet the minimum code for insulation on your line sets, they need a minimum R-3 value.  This should be clearly marked and listed by the manufacturer.  This seems simple but most of the industry uses untested, unmarked line sets that have no UV ratings.  Spend the extra few dollars, particularly for heat pumps, as this will go a long way with regards to efficiency.  Plus, it is required by code and not worth finding this out and re-installing a split system - that is a profit killer!

     There are many more code requirements that any HVAC Contractor should already know.  This list tends to be the least enforced in most areas.  Just because the speed limit is not actively being enforced does not mean you can safely travel at twice the speed, does it?

DIY Minisplits: Which side are you on?

  Recently, Friedrich has modeled and sold in limited markets their DIY Mini-Split Heat Pump, Breeze.  Just a few days ago, they scaled back their rollout in order to meet customer demand by limiting sales to New York and South Florida.  I am torn between two very valid arguments on this product, the HVAC Professional and the Energy Geek in me have compelling points.  Please, read both before you provide a comment!

HVAC Professional
Proper Sizing  -  In order to properly size the equipment, and meet current building code in most of New England, an ACCA Manual J v8 Load Calculation should be performed.  Although this equipment is variable capacity, installing the larger option could be a waste of money, materials, and energy.

Equipment Installation  -  Every HVAC professional knows during installation that vacuuming of the refrigerant lines are required.  Moisture can wreak havoc in an HFC refrigerant cycle like R-410A.  Non-condensables will artificially raise liquid line pressures, decrease capacity, and raise compressor amperage.  Fortunately, the engineers at Friedrich thought of this and provide pre-charged flexible line sets that have quick connect fittings.  How long before that check valve hangs up, or wears out?

System Efficiency  -  A 115V mini-split will almost always use more watts than the same size 208/230V counterpart.  This is why a professionally installed system sport SEER Ratings from 22-27!  If disconnected following a heating or cooling season, it is guaranteed small amounts of refrigerant will leak out.  How long before the unit will not operate, or efficiencies are so low the window unit would have been the better option?  Never thought I would have said that…

EPA Clean Air Act, Section 608 – Unfortunately, this ruling that changed our industry for the better almost 20 years ago does not include the restriction of equipment sales including HFC refrigerants, like R-410A.  Although sales are not restricted, it is illegal to vent HFC refrigerants into the air. 

Energy Geek
Energy Savings  -  For a homeowner, competent enough to install this on their own, this could mean significant energy savings in both the Summer and mild parts of Winter.  Imagine how many window units that historically are operating at 7 or 8 SEER would be removed and hopefully scrapped!

Technology Advancement  -  Flexible linesets, precharged, and counted on not to leak is a far cry from some of the poor installs completed by less than competent technicians out there.  Don’t get me wrong, it is much less than 10% that falls into this category.  Maybe this is the one thing the HVAC Industry can take away from this attempt of cutting them out of a booming industry?  Gone may be the days of bad flare fittings, leaking or kinked line sets, and ripped pipe insulation.

Window Sill Accessory  -  This goes against everything I can think of as a Building Analyst.  Let us offer an accessory that can be installed in a window, already the weakest point in an insulated wall, to which a line set can pass through?  What kind of leakage would this cause, moisture pouring in, and offsetting any savings you may have had with the new product?  But, in retrospect, how leaky was it with the window shaker in there all last Summer, oh and Winter since we were too lazy to take it out!


  Can it be possible to put all of the negative factors aside and trust everyone will be installing this equipment correctly?  I can see it now, big box stores renting out DIY install kits and the product being front and center on all of those network television shows.  Maybe the idea of making these systems affordable by cutting out installation labor costs could make sense for some parts of the world.  Please, I do not want to see them in parts of our country that have power problems and Efficiency Rebate Programs to promote the proper design and installation of systems that can save significant electricity!  I would hate to be a Friedrich Dealer in these areas where sales have already begun; I guess things could always be worse…

5 Things New Energy Efficiency HVAC Contractors Need to Know

1.  Do not sell on Price! Use 'Simple Payback'
  The price of High-efficient equipment will undoubtedly cost more money up front, compared to the minimum efficiency systems.  Taking into account existing repair bills, utility bills, installation, and equipment costs, a high-efficient furnace, boiler, or heat pump will cost the homeowner less over the estimated 10-15 years of operation.  When completing the 'Simple Payback' calculation, the high-efficient heating system in New England will win-out every time!  The strategy for High-Efficient Air-Conditioning Equipment is to use Rebate amounts in the calculation.  Due to much less run times, without introducing utility rebates into the equation, High-Efficiency Air-Conditioning can be a tough sell!  Be sure to highlight the additional features, such as increased comfort, indoor air quality, reduced noise, and environmental impact that can not be reflected in the payback calculation alone.

2.  Trusting Load Calculations (ACCA Manual J)
  One of the first barriers a new energy efficiency contractor must break through is proper equipment sizing.  Learning to complete a site survey, and enter gathered information into a software program can appear elementary.  Except, now you need to trust the number provided and install equipment to match that load.  Please, have no fear!  If completed correctly the system design process works!  You must use your local design temperatures and proper indoor conditions to satisfy local codes.  Do not manipulate this information as oversized equipment will likely operate less efficient than that 13 SEER A/C or 7.5 HSPF Heat Pump you have moved on from installing.

3.  'Customer Education after Equipment Installation'
  Properly sized, high-efficient equipment does not operate the same way as the larger, less efficient counterparts.  These systems will not have quick recovery times and are sized to maintain comfort in the home.  This means customer education after equipment installation.  Be sure that the programmable thermostat does not get set back too far, only a few degrees in cooling.  Also, the controller should not be an on/off switch!  Remind your customers that setback on a hot summer day is recommended instead of turning your thermostat to 'Off'.  This will make them more comfortable when they arrive home from work, and save peak power during the highest demand.  I have heard contractors explain to their customers that on a hot day, if the thermostat was off, the system may take up to one hour per degree to recover!

4.  Maintenance
  In order to meet customer's expectations, and manufacturer warrantees, annual maintenance of high-efficient HVAC equipment is mandatory!  Whether it is basic air filter and coil cleanings for air-conditioners, CO safety checks on furnaces, or possible limescale removal from a boiler, annual maintenance is required to achieve the efficiencies promised in the sales process.  Start educating the customer at this point, do not let it be a surprise years down the road after equipment failure.  If adopting this path, your preventive maintenance program should flourish with happy, vocal customers.

5.  Contractor & Technician Continuing Education
  When you make a conscious effort to promote energy efficiency and increase your brand, continuing education becomes a necessity.  Every year manufacturers and distributors introduce new, more efficient equipment to your sales team, teach the technicians how to maintain and service, only to turn around and make changes the following season.  This process can become frustrating to even the most motivated contractors.  If you want to participate in this process, continuing education to keep up with new technology is a must!  Do not skip that evening class at your local distributor next week.  Just ask any of the Old Timers in HVAC, just blink and the industry will pass you by!

How can I compete and still do jobs right?

  I think we all understand to complete a ducted system replacement or installation correctly, it takes time and resources that the low bidder just does not have.  Of course, this implies to do things right you are not the low bidder!  So, how do you sell a quality installation?  Fortunately, EnergyStar is looking after you.  Take a look at this checklist, use it on your sales calls this Spring and explain to the customer the quality component of your business.  Make sure your customer can easily compare what you do versus the low bidder and talk about "what is in it for them".  If you are confident in your quality services and pricing, encourage the customer to seek additional quotes!  The candor and professionalism can be refreshing and gain the trust in a process filled with skepticism.  Of course, take advantage of rebates and contractor incentives!

Can you trust your Load Calc Software?

Attention Wrightsoft Users!
  Have you ever completed a load calculation and it just seems like it was short of what you had expected?  Particularly when you are first starting out with a tool, contractors can make mistakes. After all, we tend to learn "the hard way", right?  In an effort to make software work, the companies tend to start with some default values that require adjustment.  For instance, most have the duct system in the conditioned space calculating zero gains or losses.  If the ducts were in the attic, this could be as much as a one ton load that is missed! Internal gains tend to start at zero, and the foreground for windows is something between crushed rock and green grass.  Most contractors find these values, over time and as they gain experience with the program.  One still overlooked setting in Wrightsoft, a feature that no other ACCA approved software employs, is the Rate Swing Multiplier (RSM).  This can cause you to lose as much as 11% of your sensible gains in an otherwise perfect load calculation, maybe more!

  This adjustment, the Rate Swing Multiplier (RSM), is used as a makeshift way of selecting cooling equipment by using AHRI data.  Those familiar with ACCA Manual S, Equipment Selection in the residential design procedure, and International/Local codes, know this makeshift procedure is not proper design and will likely contribute to over sized equipment.  What many users do not realize is this RSM de-rates your sensible gains on your Summary Report!  If you then use what you thought was the correct numbers, you may install a system that is too small, or set your fan speed too low due to the decreased sensible gains.

If you do not change the default Sensible Heat Ratio (SHR) from the .70 in your equipment selection, then the RSM remains at .89.  If you use suggested values from local utilities (SHR .85), carefully calculated to reduce selection of over sized equipment, this RSM raises to .93.  If you know how to calculate the SHR of the home, a fairly simple process, the RSM will fall anywhere between those values already discussed.  The example images do not reflect the same load calculation and are for RSM & SHR reference only.

  Great news!  You can just turn this sabotage of a design feature 'OFF', as you should!  If I was a building inspector, I would fail any report that showed up with a RSM other than 1.0.  To do so, go to 'Options' in top menu, then uncheck 'Adjust Load for AHRI Standard Rating'.  Easy as that, and now you will not be short changing yourself on those accurate, aggressive load calculations.  Of course, this alone will probably not change your equipment size, but combined with another small misstep and it very well might!

Do you make this mistake on Maintenance?

     Cleaning the condenser coil.  This has always been the number one task that Service Technicians avoid at all costs when maintaining residential equipment.  Maybe it is the nature of the fast paced business when the weather gets hot?  Certainly could not be the lack of water to rinse the coil as there is almost always is a water spigot on either side of the home.  I cannot figure out why,  and this may be one of the largest aspects of seasonal maintenance that impacts the efficiency of the unit.  Sure, the system will still operate if not cleaned, for a while.  Lets explore just how the capacity and EER are impacted...
A/C Expanded Cooling Data
     For an air-conditioner operating at design load, lets estimate 85F for simplicity, the condenser can deliver close to the nominal capacity.  Remember, nominal capacity is in tons, from 1.5 to 5 tons, in half-ton increments for residential equipment.  There are 12k btu/hr per ton.  In my example equipment, the unit is 36K btu/hr or a nominal 3 tons.  At design operating conditions, my unit will deliver 35,400 Btu/hr which is very close to the nominal rating.  When a condenser becomes dirty or fouled, the unit cannot easily reject heat from the refrigerant.  This in turn drives up your liquid line pressure and the system artificially operates at what can be determined a higher outdoor ambient than actual.  For a R-410A system with a dirty condenser, the liquid line pressure could be as high as 60# higher than normal.  This equates to approximately 20F.  So, instead of rejecting heat and operating at a capacity for 85F, the condenser think it is more like 105F.  This reduces the capacity of the system by 3,700 btu/hr.  Guess, what?  The condenser never gets cleaner without someone doing so!  Therefor, the capacity losses only get greater throughout the season.  To put this in perspective regarding efficiency, the system was operating at an EER of 13.8.  With the dirty coil, the system is operating at 10.1 EER!  When I said you were losing 3,700 btu/hr you probably thought, So What!  But at 105F, the condenser has to work much harder to deliver less capacity!

Heat Pump Heating Data
     For a heat pump, the penalty on your electric bill might be more severe - in a cold climate like New England.  As the condenser coil gets dirty, the heat pump operating in heating mode will begin to decrease in capacity just like an A/C.  In my example data for a comparable heat pump in capacity to the A/C, the unit will deliver close to the nominal rating at 47F (35,400 Btu/hr).  If the coil is dirty, it is not out of the realm of possibility to have a system operating 17F less than the actual outdoor ambient.  In this example, that drops our capacity down to 27,500 Btu/hr, a loss of 7,900 Btu/hr.  More important, the decrease in EER from 13.6 down to 11.3.  What this does not take into account is the increase in defrost cycles and use of supplemental heat since the heat pump will not be able to keep up in just the mildest of weather!
     One phenomenon I have yet to fully understand is the Heat Pump Mini-split.  Don't get me wrong, I have installed hundreds of these systems over the past 10 years.  But, the heat pump tends to keep itself clean in New England!  I think it has to do with the micro channel coils and long heating seasons.  They almost wash themselves off every Winter, and stay clean enough through the Summer.  Kind of kills the chance of making money for maintenance on these.  Except for the A/C only versions, if you do not clean the coil eventually it will shut itself down!

4 Things a Quality Contractor Would Not Say

1.  If you sign today, I will take $X thousand off!
  This is a sales tactic often taken by a used car salesman.  A Quality HVAC Contractor will price their installation with confidence, after finding a solution to fit the needs of the customer, and correctly sizing such equipment.  I have no problem with "ballpark" numbers over the phone, as this can help sift through customers that are not interested in quality, so contractors do not waste time on what tends to be free sales calls.  Do not let a salesman pressure you into signing a document before he leaves, unless you need to replace a system that is no longer operable.  Otherwise, this should raise some suspicion as to the urgency.

2.  How many square feet is your house?
  This is only one factor when sizing a heating or cooling system.  If this question is not preceded or followed up with questions like: How is the insulation?  What type of windows are installed?  As well as a quick survey of the home to gather the remainder of the details, then the system could not possibly be sized right.  "I've been installing these systems for 20 years, and never had a call-back!" is not a suitable replacement for the International Residential Code and State building code requirements of using ACCA Manual J, version 8.  In order to complete this calculation, software is required.  Although, most heat loss calculations could still be completed long hand.  Any sort of short forms or calculations not having the ACCA Manual J Approved logo are not complete and do not meet the minimum required by law.

3.  The payment is only $X a month!
  This is another sales tactic that can often be used to mask the total cost of the job.  Don't get me wrong, being able to offer financing is important for a Quality HVAC Contractor as they tend to install and quote higher efficient equipment.  This equipment undoubtedly costs more compared to their less efficient alternatives.  A homeowner should be concerned with the total cost of the job, as well as the monthly payment.  This is how cell phone companies hook customers into long term contracts, by offering low cost or free phones at the highest possible monthly payment.  This can be hard not to see past as a homeowner since the energy savings of the new system, combined with the monthly payment, will most likely be lower than the current monthly utility bill.   Remember, a lower total cost will equate to a lower monthly payment.  Get more than a single quote, particularly if you do not have an established relationship with the Contractor.  Also, remember that the lowest price is not always the best price!

4.  I will beat the lowest price!
  A Quality Contractor will be less concerned with the prices you have or will receive from other companies, since they know what it takes to stay in business.  This means a fair price for the high quality of work and equipment, combined with a satisfied customer.  If a company always "beats the lowest price", I doubt they can employ the best installers and technicians, and I would worry if they will still be in business when you need them.  Even the latest and greatest system breaks down now and then, requires service, or even needs to be replaced in the next 10 to 15 years.
  On the other extreme, a high price can be perceived as high quality.   This could be true, if the Contractor can prove to you the reason for such a cost.  Otherwise, it could be price gouging.  Unless you have something to compare, how could one ever know?

The Basics: Superheat

   Vital to the operation of the refrigeration cycle, superheat must be maintained and stable to protect the compressor.  We all know that the heart of the system cannot compress liquid (slug) without bad things happening.  This would represent low/no superheat.  But, did you know high superheat can cause valve and compressor problems as well?  No matter the reason for attaching your gauges to the system, you must check the superheat, in the air-conditioning cycle.
Q:  What is the Saturation Point of R-410A @ 118#?
A:  40F
  Imagine you are barbecuing this weekend and decided to boil some water on that side burner.  If we were at sea level, say Boston, MA for instance, that water would boil at 212F.  Bostonians learn this at a wicked early age, but what we neglect to remember is this is at an atmospheric pressure of 14.7# (0 psig).  If we boiled the same water in Denver, CO, the boiling (Saturation) point would be approximately 202F, due to the lower atmospheric pressure at higher altitude.  This represents the Pressure/Temperature relationship, which holds true since the discovery of Boyle's Law in the 1600's.
  On the flip side, if we contained all the boiling water in a pressure cooker, we are able to manipulate the boiling point higher by driving up the pressure.  This relationship in the refrigeration cycle is measured on our gauges, yet found in the middle of the evaporator and condenser coils on a properly charged system.  Fortunately, the most used tool in an A/C Technician's arsenal can no longer be left in the van as the P/T chart is built into the Digital Analyzers these days.
   Now, let's say we are able to contain all of the steam being boiled off the pan on the grille.  Once all of the water is boiled off at 212F and we make that steam 213F, 214F, 215F; this becomes 1F, 2F, 3F of superheat.  Superheat is the amount of sensible temperature we add above the Saturation point. We, as technicians, measure this sensible temperature on the suction/vapor line at the condensing unit. When making the measurement at this popular location, remember that this represents the total superheat.  Total superheat is different than the Evaporator Superheat, which would be measured at the outlet of the Evaporator.  Pressure drop and temperature gains of a line set can give you a false sense of high superheat on a high load day.
  Once you have measured the Sensible Temperature of the Vapor Line, deduct this from the Evaporator Saturation Temperature (Low-Side Gauge Pressure converted to Temperature on your P/T Chart), and the result is your Superheat!  Generally speaking, Thermostatic Expansion Valves (TXV's) and their Electronic counterparts (EXV's) maintain decreasing superheat as the efficiency of the equipment rises.  Therefor, proper valve operation is critical to prevent compressor failures.  TXV's  typically maintain between 5F - 25F of superheat. Yet very high efficient system that employ EXV's could be as low as 2F!  This gets dangerously close to 0F, representing the possibility of liquid getting to the compressor.  Of course, Superheat is how we adjust the refrigerant charge with a fixed metering device (i.e. piston, capillary tube).  System airflow and heat content of the air can also play a role in the superheat.
  The only reason to attach your gauges on an operable system is to find the Saturation Temperatures of the refrigerant cycle, used to verify proper refrigerant charge.  Why does this not get recorded and monitored?  Is it as simple as lack of understanding of the single most important aspect to the refrigerant cycle?  I know if I did not fully understand something as critical to my job as this, I would be embarrassed and avoid it at all costs.  Maybe we just need a little refresher, become a little more confident, and then we will begin protecting compressors thereby avoiding call-backs and warranty losses!